Tuesday, December 25, 2018

MERRY CHRISTMAS EVERYONE! Here’s my last christmas mani of the year to close this special nail art serie.
For this nail art, I did a gingerbread man and a holly branch. I’m so devoted to my art (lol) that I actually bought this green polish to do this mani. I saw this design by Nailsuponatime on Instagram and wanted to recreate it so when I went shopping with my best friend, I bought a sparkly green polish because I didn’t have one at least I thought so… Now that I think of it, I might have a similar polish from Kiko but I couldn’t put my hands on it yet so we will just pretend that I was right for buying a new polish. 
I used to love Hema polishes so much when I was in high school mostly because it was one of the only brands I could buy back in the days. I have to say that the quality is really good for the price. Most of the polishes that I bought years ago are still good to use. 
Polishes I used :
Hema : Striking Green
NCLA : Cinnamon Girl
Claire’s : Beige
Sephora : Sugar Coated
Mavala : Red Diamond
Nailmatic : Grazia
Bourjois : Beige Distinction
White Polish

Sunday, December 23, 2018

I’m continuing this christmas nail art serie with a candy cane watermarble. This watermarble the one I did 2 years ago using only Primark polishes. This post is an upgrade one, I feel like I’m getting better to watermarble.
When I did this nail art, I didn’t use liquid latex to protect my skin and no need to say it was a mess. My parents (who don’t usually pay attention to my nails) were like : “wtf is going on with your nails?”. My skin was literally covered in red polish and I didn’t clean everything right after doing my nails. I was literally walking around my house with red hands. After litre of polish remover and multiple Q-tips, I have managed to reachieve a normal skin. 
For this watermarble, I used OPI Adam Said “It’s New Year’s, Eve”… again! This polish is THE polish of christmas. I also used OPI “Sweet Heart”. 
Polishes I used :
OPI : Adam Said “It’s New Year’s, Eve” 
OPI : Sweet Heart
White Polish

Saturday, December 22, 2018

Another christmas nail art, *Dj Khaled’s voice* another one! 
For this nail art, I did a plaid design using OPI Adam Said “It’s New Year’s, Eve” like in my last christmas nail art. It’s a nail polish from their 2017 holiday collection “Love OPI, xoxo” so it’s the perfect red for christmas nail art. 
This mani is inspired by TheBusyNails on Instagram.
Polishes I used :
OPI : Adam Said “It’s New Year’s, Eve”
OPI : Up Front & Personal
Butter London : Startford Honey
Black Polish

Wednesday, December 19, 2018

Ya girl is busy with finals but she posts anyway. I really wanted to post this mani because it's quite special to me. I realized that I never did a design inspired of a song when I'm huuuuge fan of music. I was scrolling through Instagram the other day and I saw the nail art that BadGirlNails did for the release of Ariana Grande’s new music video and I knew had to give it a try.
So this nail art inspired by Ariana Grande's music video "Thank U, Next". No, I ain't grateful for my ex because I have none of them. I got 99 problems but love ain't one, I guess. Even though I didn't relate to this part of the song, its message really did speak to me. I like the idea that we can be grateful for the good AND for the bad. I'm grateful for the people I crossed path with, for the experiences I lived and for all the emotions I ever feel. I realize that when I reflect on the past especially on the bad, I tend to focus on the things I learned from that.
I guess whatever happens, you just have to brush it off and keep shining.
Thank U, next bitch!
Polishes I used :
OPI : Sweet Heart
L’OrĂ©al : Nymphea
White & Black Polishes

Wednesday, December 12, 2018

Here I am jumping on the christmas nail art bandwagon. I won’t lie to you, I’m pretty proud of this mani. At first, I just wanted to do a red french with gold bows but my extra ass thought that it wasn’t enough festive so I drew plaid to make it more chrismassy. 
Polishes I used :
OPI : Adam Said “It’s New Year’s, Eve”
OPI : Up Front & Personal
L’OrĂ©al : L’Or
Black Polish

Tuesday, December 4, 2018

Lazy me back with a lazy mani. When I don’t know what to do on my nails, I just do a glitter gradient. It’s quick and pretty. 
This nail art is just a reversed version of this one. Btw, I love the glitter polish that I used in this mani, it’s Essie “Set in Stones”.
Polishes I used :
Essie : Groom Service
Essie : Set in Stones

Wednesday, November 28, 2018

Months ago, I went to Disneyland with my friends so I did a special mani for this occasion. 
So for this nail art, I did bows on my pointer fingernail. Then, I did Minnie on my middle fingernail and Mickey on my ring fingernail. I’m not gonna lie, I’m not really good at drawing cartoon character especially for the eyes as you can see it on Mickey haha. He looks kinda awkward, I did Minnie better. I shoul’ve redone it. And I draw Mickey’s outfit on my pinky fingernail. 
I was inspired by Yoko Nail Art on YouTube who is a french nail artist. I followed her tutorial to draw the Tsum Tsum. 
Polishes I used :
OPI : Red Lights Ahead… Where ?
Etam : The Peach Boys
White & Black Polishes

Sunday, November 18, 2018

I’m literally drowning in stuff to do but I still post anyway. You probably know this gif with a dog in the middle of his house on fire pretending that everything is ok, I’m the dog. 
This nail art is more in the fall mood than the last two ones that I posted. I used a deep green by OPI and a silver polish with glitter to draw a triangle on my pointer fingernail, stripes on my pinky fingernail and to do an accent nail on my ring fingernail. I really love this silver polish from Bourjois, I featured it in some of my nail art before. I will probably have to buy a new bottle of it haha.
Polishes I used :
Bourjois : It’s Raining Stars
Deborah Milano : n°87 
OPI : AmazON… AmazOFF

Sunday, November 11, 2018


I don’t really know what to think about this nail art. Well, it’s not that awful I guess lol. 
For this nail art, I wanted to use bright colors on a neutral base. I did some stripes on my index and middle fingernails. And because I love them so much, I did some bows on my ring and pinky fingernails. Let’s just say that this nail art is a colorful version of this one that I posted one month ago.
Polishes I used :
Essie : Limo-scene
Essie : Take a Walk
Sephora : Will You Be Mine ?
Sephora : Lilac Fantasy
Etam : Baby Boy
Black Polish

Sunday, November 4, 2018

I’m back with a not so fall nail art. We always need some flowers in our life no matter the season. 
For this nail art, I was inspired by Marc Jacobs “Daisy” bottle fragrance. I always found the packaging of the “Daisy” line really pretty. 
This manicure is really cute and easy to do. You can really never go wrong with flowers. Also, I love the colors that I used.
Polishes I used :
Essie : Coconut Cove
Essie : Brides No Grooms
Formula X : Splendid
China Glaze : Aquadelic
Modelite : F40
Barry M : Christmas Gold

Wednesday, October 31, 2018

Cause baby now we got bad blood.. For Halloween, I have decided to do a bloody nail art. This is actually the first time that I do a manicure for Halloween, it might be because I’m not really fond of this celebration. Unlike in the US, Halloween is not really a big deal in France. When I was kid, I used to hate when other kids would ask for candy. I hated sharing I guess lol. 
For this nail art, I have decided to go for something simple. I did some drops of blood. I first started by applying “Off-The-Shoulder” by Sally Hansen. Then, I applied a matt top coat. I’m not a matt top coat kind of girl, I really love shiny top coat. But I found that matt top coat was perfect for this nail art. Finally, I did the drops of blood using Barry M “Red Black” and Essie “Fifth Avenue”. This nail art is inspired by NailStorming on Instagram.
The set up for this picture is quite different from usually because two of my friends bought a lightbox and I have to say that I’m liking the black background better than the white one that I used in my other pictures.
Polishes I used :
Sally Hansen : Off-The-Shoulder
Barry M : Red Black
Essie : Fifth Avenue

Wednesday, October 24, 2018


Just a quick post in the middle of this busy not to say awful week, I know we’re just half way through it but oh god the tiredness is real.
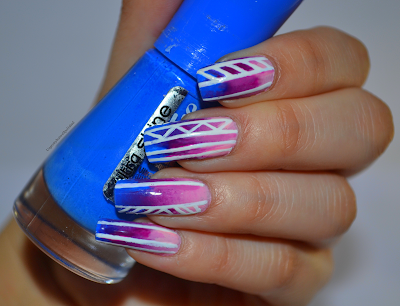
So for this nail art, I did a gradient using pink, purple and blue and I did some white patterns on the top. 
Polishes I used :
Bourjois : Bleu Fabuleux
Bourjois : Pink-itude
Bourjois : Rosé Merveille
Maybelline : Berry Stain
Revlon : Coy
White Polish

Monday, October 15, 2018

Nail art can be cheesy too… This manicure is here to prove it lol. It’s full of hearts… If this nail art was a movie it would be “High School Musical” like you know full of songs and happiness. 
For this nail art, I did some hearts on my ring fingernail and stripes on the other fingernails. 
Polishes I used :
Revlon : Coy
Revlon : Red Hot Tamale
Maybelline : Deep Red
L’OrĂ©al : Nymphea

Saturday, October 6, 2018

Months ago, I’ve been contacted by Pink Gellac to do a review of their gel polish kit for beginners. This is my second collaboration for this page and I’m always grateful each time that I have opportunity to test out new products. 
Before using this kit, I have never used gel polish. Even if people often mistaken and think that I use gel polish. What I love about the Pink Gellac kit is that there is a step by step tutorial to show you how to use it. That was very useful for me since it was my first time using gel polish. For a first try, I did pretty ok I think haha. I have decided to test myself like really! I didn’t go for the simple mani with just one color. You probably know me now, I can’t do just one color on all my nails. This is impossible. I have to say that doing nail art with gel polish is a little bit harder than with regular nail polishes because of the consistency of the gel polish. 
I was pleasantly surprised by the odour of the gel polishes that wasn’t overwhelming. I was exepecting it to be really strong but it wasn’t so working with them wasn’t bohersome. Also, the application was really easy. 
Overall, this kit is really perfect for anyone who wants to start using gel polish. Everything you need to do a perfect mani is included.
Polishes I used :
Pink Gellac : Lipstick Red
Pink Gellac : Vintage Nude
Pink Gellac : Beautiful Black
White Polish

Saturday, September 29, 2018

This mani is kinda festive. It’s perfect for christmas with the glitter and the bows. I love this nail art, it’s simple and classy. Also, the base I used : “Limo-Scene” by Essie is the perfect nude for clean nails.

I already used “Limo-Scene” in a previous nail art. I also associated it with a gold polish, I guess they both do a good combo.
Polishes I used :
Essie : Limo-Scene
Barry M : Christmas Gold
Revlon : Silver Dollar
Essie : Set in Stones
Sephora : Gold Fever
Black Polish

Saturday, September 22, 2018

Today, I take you for a trip to space! I did a galaxy nail art for today’s post. It’s the first real galaxy mani that I’ve ever done and it’s not that bad I think haha. I was afraid to fail it and that it ends up looking like nothing because I’m more at ease with doing designs with a brush than with a sponge or else. 
Barry M : Indigo
Essie : Strut Your Stuff
China Glaze : Fairy Dust
White Polish

Sunday, September 16, 2018

As promised, here’s my back to school nail art. For those who are wondering, I’m a digital marketing student and I’m on my second year of Master which means internship which means Master’s thesis which means heavy tears.
For this nail art, I was helped by CutePolish YouTube videos because she has a a playlist dedicated to Back To School nail art. I just picked 5 designs among all her designs. So I chose to do a chalkboard on my pointer fingernail, a lined paper on my middle fingernail, a pencil on my ring fingernail and a ruler on my pinky fingernail.
Polishes I used :
Nails Inc. : Notting Hill Carnival
Revlon : Emerald 
Essie : Go Go Geisha
Essie : Mink Muffs
L’OrĂ©al : Dimanche Après-Midi
Formula X : Continuum
Maybelline : Flamingo Pink
Sally Hansen : I Pink I Can
Rimmel : Apricot Punch
Deborah Milano : n°87
White & Black Polishes

Sunday, September 9, 2018

This mani totally belongs to the : “Lazy mani by Jenny” serie. You know these nail art that you do when you have no inspiration nor time but you still want something on your nails. I have to say that I HATE having naked nails and I hate having no nail art on them too so a simple design is better than no nail art at all.
So for this nail art, I used a red polish as my base then I did some gold triangles near my cuticles. All the polishes I used for this mani are from Formula X and you guys probably know how much I love this brand. The quality is really good and their range of colors is wide.
Also, stay tuned for my next post because it will be a little bit special. I will post a back to school nail art because yes I’m still a student but it’s my last year as a student so I have decided to do a design to celebrate my last year in school.
Polishes I used :
Formula X : Fahrenheit
Formula X : Epiphany